Tag Archives: hardware

Arduino ethernet hardware watchdog

So I have a few raspberry pis that (3 in fact!), and sometimes have them set up for remote access such as a raspberry pi webcam using the raspberry pi camera, web servers, remote power socket control, weather monitoring, energy usage – the usual geeky stuff.

Various raspberry pi projects of mine!

Anyway, sometimes the thing runs smoothly and reliably for years on end without problems (usually the less you tinker with it!), surviving power cuts and what have you. My first Model B Rev 1 Pi (thanks Dad!) is an example of these. It ran for years monitoring temperature/humidity and air pressure, before finally being shutdown due to a house move (someday i’ll have to resurrect it!).

Sometimes however, things don’t go to plan and Linux will crash or lock up, or the network interface will go down on power cuts. For instance I once wrote a script to restore the wifi connection of a pi in my GF’s locked and empty house using a lovely blackberry smartphone while sitting in a buddy’s car eating kfc chicken outside. But that’s another story! (Thanks Andy!). It usually happens right when you’re away the Pi and trying to login remotely!

I tried using the raspberry pi watchdog timer (see here: Raspberry pi Watchdog timer), but this didn’t seem to fix the problem

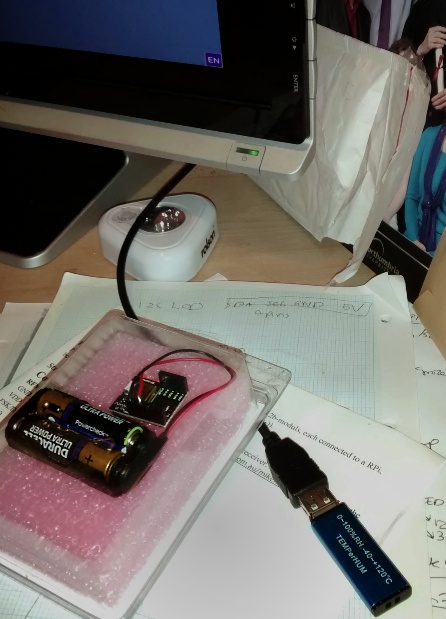
So I built an Arduino hardware watchdog that keeps an eye on the ping result of a host on the network, and reboots the device if it fails tor respond. IT has a 16×02 lcd to display current action/state although someday i’d like to have leds for each state instead. with a button to manually reboot.

The project utilized a remote control socket (from Maplin, RIP), an arduino uno with an ethernet shield and a 16×02 lcd shield (with pin 10 bent out to prevent issues between the ethernet shield and the lcd shield backlight) plus a 433mhz tx module and the rcswitch library.

Maplin/Wilko remote sockets, available here 

code below

/*
Ping Example

This example sends an ICMP pings every 500 milliseconds, sends the human-readable
result over the serial port.

Circuit:
Ethernet shield attached to pins 10, 11, 12, 13
433mhz tx module on pin 2
LCD on pins 8, 9, 4, 5, 6, 7

Pin 10 of the LCD bent out of socket to prevent issues caused by the backlight

created 30 Sep 2010
by Blake Foster

Modified by Garreth Tinsley

*/
const int txDataPin = 2;

#include <SPI.h>
#include <Ethernet.h>
#include <ICMPPing.h>
#include <RCSwitch.h> // for 433 tx module/remote switch control
#include <LiquidCrystal.h> // For LCD
long retrytimeout = 15L * 1000L; //recheck every 15 seconds
long cycletimeout = 120000;
long starttime;
long currtime;

bool looptwice = false;

byte mac[] = {0xDE, 0xAD, 0xBE, 0xEF, 0xFE, 0xED}; // max address for ethernet shield
//byte ip[] = {192,168,2,177}; // ip address for ethernet shield
IPAddress pingAddr(192, 168, 1, 2); // ip address to ping

SOCKET pingSocket = 0;

char buffer [256];
ICMPPing ping(pingSocket, (uint16_t)random(0, 255));
RCSwitch mySwitch = RCSwitch();
LiquidCrystal lcd(8, 9, 4, 5, 6, 7); // initialize the LCD library with the numbers of the interface pins

void setup()
{
lcd.begin(16, 2);
lcd.setCursor(0, 0);
lcd.print(“Rebooter 0.2”);
//0.1 it works!
//0.2 it works an is neater (lcd printing countdown, ip addr print not . after last octet, padding seconds)
lcd.setCursor(0, 1);
lcd.print(“starting…”);
Serial.begin(9600);
// start the Ethernet connection:
if (Ethernet.begin(mac) == 0) {

lcd.clear();
lcd.setCursor(0, 0);
lcd.print(“IP DHCP CONFIG”);
lcd.setCursor(0, 1);
lcd.print(“Failed! Halting.”);
// no point in carrying on, so do nothing forevermore:
while (true) {
Serial.println(“no dhcp, halted”);
delay(1000);
};
}

lcd.clear();
lcd.setCursor(0, 0);
lcd.print(“IP DHCP CONFIG”);
lcd.setCursor(0, 1);
printIPAddress();
delay(2000);

//start the rc tx module
mySwitch.enableTransmit(txDataPin);
}

void loop()
{
lcd.clear();
ICMPEchoReply echoReply = ping(pingAddr, 4);
if (echoReply.status == SUCCESS)
{
lcd.setCursor(0, 0);
lcd.print(“Ping succeeded.”);
sprintf(buffer,
“Reply[%d] from: %d.%d.%d.%d: bytes=%d time=%ldms TTL=%d”,
echoReply.data.seq,
echoReply.addr[0],
echoReply.addr[1],
echoReply.addr[2],
echoReply.addr[3],
REQ_DATASIZE,
millis() – echoReply.data.time,
echoReply.ttl);

starttime = millis();
currtime = starttime;
long prevtime = starttime;

while (currtime <= starttime + cycletimeout) {
if (currtime >= prevtime + 1000) {
//update the lcd every second
lcd.setCursor(0, 1);
lcd.print(“retest in: “);
lcdPrintSecondsQuad(((starttime + cycletimeout) – currtime) / 1000L);

//lcd.print(“s”);
prevtime = currtime;
}
delay(100);
currtime = millis();
}

}
else
{
sprintf(buffer, “Echo request failed; %d”, echoReply.status);
lcd.setCursor(0, 0);
lcd.print(“Ping failed”);

//ensure ping has failed twice consecutively
if (looptwice == true) {

lcd.setCursor(0, 1);
lcd.print(“Switching off…”);
/* See Example: TypeB two rotary */
mySwitch.switchOff(4, 4);

delay(3000);

lcd.setCursor(0, 1);
lcd.print(“Switching on…”);
mySwitch.switchOn(4, 4);

lcd.clear();
lcd.print(“Waiting 1 minute”);
lcd.setCursor(0, 1);
lcd.print(“please wait…”);
looptwice = false;
//delay(cycletimeout);

starttime = millis();
currtime = starttime;
long prevtime = starttime;

while (currtime <= starttime + cycletimeout) {
if (currtime >= prevtime + 1000) {
//update the lcd ever second
lcd.setCursor(0, 1);
lcd.print(“reteest in: “);
lcd.print(((starttime + cycletimeout) – currtime) / 1000L);
lcd.print(“s”);
prevtime = currtime;
}
delay(100);
currtime = millis();
}

}
else {
lcd.setCursor(0, 1);
lcd.print(“retest in 15s”);

looptwice = true;

starttime = millis();
currtime = starttime;
long prevtime = starttime;

while (currtime <= starttime + retrytimeout) {
if (currtime >= prevtime + 1000) {
//update the lcd ever second
lcd.setCursor(0, 1);
lcd.print(“retest in: “);
lcdPrintSecondsQuad(((starttime + cycletimeout) – currtime) / 1000L);
prevtime = currtime;
}
delay(100);
currtime = millis();
}

delay(retrytimeout);
}
}
Serial.println(buffer);
}

void printIPAddress()
{
Serial.print(“My IP address: “);
for (byte thisByte = 0; thisByte < 4; thisByte++) {
// print the value of each byte of the IP address:
lcd.print(Ethernet.localIP()[thisByte], DEC);
Serial.print(Ethernet.localIP()[thisByte], DEC);
if (thisByte < 3) { //dont dot if last octet
lcd.print(“.”);
Serial.print(“.”);
}
}

Serial.println();
}

void lcdPrintSecondsQuad(int digit)
/* A ten percent reduction in input voltage
will cause the lower bound to drop by ten.
This sketch is calibrated for ~4.9-5.1v
using the linksprite LCD shield. */
{
if (digit < 10)
{ // 9s
lcd.print(” “);
lcd.print(digit, DEC);
lcd.print(“s”);
}
else if (digit < 100)
{ // 99s // 10s
lcd.print(” “);
lcd.print(digit, DEC);
lcd.print(“s”);
}
else if (digit < 1000)
{ //999s //100s
lcd.print(digit, DEC);
lcd.print(“s”);
}
else if (digit > 999)
{ //1000s
lcd.print(digit, DEC);
}
}

Links to guides for some of the projects i’ve tried:

  • Raspberry ambilight clone for Raspbmc/OSMC (Kodi on Linux) – Hyperion Project:

    WS2812b leds providing ambilight like backwash

  • Raspberry pi hardware watchdog timer (reboot on crash using kernel module, only requires raspberry pi, no external hardware) – Raspberry pi Watchdog timer

Ps sorry this post is long and a bit rambly, it was written across a few years!

PPS if anyone knows how to get wordpress to display C++/Arduino sketches nicely with syntax highlighting etc, please let me know in the comments!

Arduino Variable Types Explained

Here’s something for reference.
I can never find just quite the succinct reference to Arduino Variable types. Nowhere could i find a list of minimum and maximum values, the bits, and the memory used by each variable type.

Neither was there any clear definition of meaning of ‘unsigned’, which just means no plus or minus signs in this type – that is all numbers positive. This increases the highest number that can be stored in the same memory. (thank me in the comments).

Usage Variable type Bits Min value Max value Ram usage Comments
common boolean 8 TRUE FALSE 1 byte
common byte 8 0 255 1 byte
char 8 -128 127 1 byte  A single ‘character’ e.g. ‘a’ is a single char.  Represented by chr(65) or the binary: 01000001
word 16 0 65535 2 byte
common int 16 -32768 32767 2 byte
unsigned long 32 0 4,294,967,295 4 byte
common long 32 -2,147,483,648 2,147,483,647 4 byte
common float 32 -3.4028235E+38 3.4028235E+38 4 byte
The below types are only included for compatibility or further study.
redundant unsigned char 8 0 255  1 byte use byte instead
redundant unsigned int 16 0 65535  2 bytes use word instead
redundant double 32 -3.4028235E+38  3.4028235E+38  4 bytes use float instead
The below types are special types (see arduino.cc)
special string variable  1 byte + x An array of chars
(used for storing strings to modify)
special enum variable  N/A Like boolean but custom fixed set of values allowed instead of TRUE/FALSE.
special struct variable  N/A Public sub variables
(as if you’d made a public class)
special pointer  N/A I’ll be honest, I wasn’t sure the use of this one. Here for completeness though!
Source: https://learn.sparkfun.com/tutorials/data-types-in-arduino
Source: https://playground.arduino.cc/Code/DatatypePractices
Remark: “Unsigned” means no negative sign. This increases the range of positive numbers available.
Remark: Unsigned variables that exceed their capacity roll over back to zero. This could be useful to iterate through arrays of limited length

PPS If anyone can figure out how to properly format this table so it looks nice, with ‘center’ aligned text, please let me know wordpress was being frustrating!

(The formatting css is in the source, see the table tag)

Rfduino Chip vs Thermometer

Well, I’ve now debugged a few issues with my scripts from my last post.
(made them a bit more fault tolerant and actually take notice of $? exit statuses) .
Recap: Temperhum (USB) -> Raspberry Pi -> Xively chart, now also
RFDuino (bluetooth wireless) -> Raspberry Pi -> Xively chart

Tip:  If you’re struggling with the bluetooth on linux giving rx timeout errors (check the syslog if it’s not in the console),
update the software with the following commands:

sudo apt-get update
sudo apt-get upgrade

The Rfduino has been sitting next to my usb Temperature and Humidity sensor for a few weeks collecting data.

IMG_20140514_223244041r

RFDuino and Temperhum

Since it had been both collecting data for a few weeks and sending them to Xively / Pachube / Cosm, I had a quick look to see how closely the readings match.

Rfduino vs thermometerr

The graphs do show correlation, thank goodness, but it looks like the RFDuino’s temperature scale isn’t right. The RFDuino is only updating the graph once a minute whereas the Temperhum is 2x a minute.

I didn’t really expect great accuracy for the RFduino thermometer seeing as it’s measuring from the chip. But this would still be useful in some more basic cases.

I think next on the roadmap for the RFduino is connecting sensors/remote controls (it would be cool to attach my RelaySockets to this and control the 2 connected relays via bluetooth from my Pi and Android smartphone!


My Humidity and Temperature sensor

A Temperhum from PCSensor.

A great little bit of kit – once you work out the conversion values for the C++ USB/i2c/HID code that lets linux talk to the thing!

Mythubuntu 12.04 and Radeon 9200

Hi all, I was having trouble installing Mythubuntu 12.04 on an old PC I had lying around.
Mythubuntu is based on Ubuntu 12.04 so if you’re struggling with the ATI Radeon 9200 on there these steps should help.

(Since I have a Hauppuage Nova-T 500 dual freeview pci card from old projects, and a 2tb drive from new ones, I wanted to see about recording some films!)

Basically, when booting it would come up with a garbled, black or blank screen.

If this happens during the livecd boot, preventing you from installing, when you see the logo:

Logo that appears when first booting ubuntu from livecd.

Logo that appears when first booting ubuntu from livecd.

Hit enter, and F6 for other options, select nomodeset, hit enter to enable then Escape and enter to boot.
If operating from a laptop, you might want to try noapic too.


In the latest grub setup – grub 2 – the boot menu is hidden, making it near impossible to access.
Might make it look pretty but is major frustrating for troubleshooting!
The script /boot/grub/grub.cfg it uses is supposed to boot in textmode if it has failed to boot, but this does not work.

The fix:

Note: you can login, type

sudo su

and then skip typing sudo with every command below (it gets quite annoying I know!)

  1. To access the grub bootmenu, hold down shift – after all your pc’s bios and add-on cards bios screens have disappeared and until it pops up – it takes a while to appear!
  2. To access the console – textmode, insert the word text and remove ‘splash quiet’ from the kernel options,
    also insert the word nomodeset
    then press F10 or Ctrl-C to boot with the new settings.
  3. Connect to the internet, if using Wired connection you may need to connect (hopefully you connected ok during the install)

    sudo nmcli -p con up id “Wired connection 1”

    If that doesn’t work check your wireless connections names with and edit the above command appropriately

    nmcli con

  4. Install xserver-xorg-video-ati

    sudo apt-get install xserver-xorg-video-ati

    (don’t freak out when you see ‘Removing Mythubuntu-desktop’ it seems to come right in the end.

  5. Create a new link for the X server
    (Not sure why this breaks after the upgrade but it won’t work without this step!!)

    sudo ln /usr/bin/Xorg /usr/bin/X

  6. Edit the default bootmenu script
    Add nomodeset to the default grub bootmenu

    sudo nano /etc/default/grub.cfg

    Change this line near the top:

    GRUB_CMDLINE_LINUX_DEFAULT=”quiet splash”
    to
    GRUB_CMDLINE_LINUX_DEFAULT=”nomodeset”
    #”quiet splash”

    The # tells it to ignore this bit, it’s a backup so that we can make it quiet again later. You’ll notice text streaming by as the system boots instead of the cute (Myth) Ubuntu …. logo

    Ctrl-X to exit, type s and Return to save

  7. Update grub

    sudo update-grub

  8. Reboot and Revel in the shinyness

    sudo reboot

I actually ran this command to to start the windows manager, (and I haven’t tried rebooting yet, shhh)

sudo start lightdm

If you have any extra trouble, comment below, check the ubuntu forums and google.
I managed to work this out on my own as I couldn’t find the answer!


I also created a script to set the resolution of lightdm at boot, following the guide here:
LightDM Resolution

This did not work as when I started lightdm, the resolution was set higher than I’d set in lightdm, so I don’t think this was part of the fix.
Thankfully it was within my monitors capabilities. I think I set the output name wrong.
I need to figure out the display outputs are available but couldn’t query it from the command line without x running, which seems kinda silly.

Hope this has been helpful!

Sports headphones Review

I’ve been looking for a really good set of headphones to use while doing extreme sports (Bocking) which has got to be the best test of how well the headphones stay in your ear!

I’ve tested a few different sets headphones designed specifically for sports (jogging) and ones that are not (in ear/noise isolating silicon ones.
Here’s a short review with ratings 1-5 (where 5 is best) in various categories. Scroll to the bottom to find out the overall winner!

Sennheiser Mx55 ((£15 from HMV)
Comfort 4 (can get a bit unconfortable after a few hours in)
Sound 5 (excellent sound quality)
Volume 4 (Not as loud as i’d expected, but also doesn’t leave my ears ringing after listening with my player on full volume)
Quality 4 (the snap on interchangeable covers designed to let you bling it up a bit are pointless and come off too easily. I’ve superglued one already, but at this price, who’s complaining?!)
Hold/fit 5 (they stayed in for hours while i bounced around, amazing!)

EDIT: Superglue the rubber bits on too, they fall off in pocket!

Skullcandy in ear
Comfort 4 (pretty comfortable until i took them out then found my ear holes were quite sore)
Sound 3 (good, but lacking something, and no matter of EQ tweaking could give me that…too crisp)
Volume 5 (ear blisteringly loud :()
Quality 2 (poor, the metal mesh on one of them fell off after about a week, and then the speaker on that side got kind of bent in and the volume halved)
Hold/fit 2 (fall out often, not suitable for jogging/sports)

Sony Active MDR-AS20J Ear Clip Sports Headphones ~£12
now it’s been a little while since i used these headphones so forgive me if i’m a little less specific. These have got to be my second favourite since the Sennheiser MX55.
They disappeared a while back and I can’t seem to find them anymore 🙁 lol.
Comfort 4
Sound 4
Quality 5 (survived being chucked into my bag with various implements until they disappeared)
Volume 4 (not as good as the in ear ones obviously, but louder than the MX55’s)
Hold/Fit 4 (the stay on, but its a bit fiddly to get them on)

Sennheiser CXII300 In ear noise isolating ~£30
These were quite expensive for me, but sounded greate and lasted ages. The hold while Bocking wasn’t too bad (it helped taping the cable to my neck with a plaster to prevent tugging).
I killed them by accidentally snagging the cable on a street sign and turning round. The cable separated at the connector.
Comfort 3 (got a bit uncomfortable after an hour or so)
Sound 5
Quality 4 (good, rubbery cable didn’t seem to kink and was easily wrapped but the rubber cable ends on the buds slid down after a good few months of kicking around in the bag)
Volume 5
Fit/hold 4 (not best suited to sports, the cable always caught on my clothes and dragged them out of my ears. Better fit than the skull candy though.)

My recommendation? Get the Sennheiser MX55. Great hold and sound quality for an amazing price. I don’t miss the volume, my hearing seems to be improving now (i think a volume rating of 5 is excessive!!).

The in ear/noise isolating ones especially the sennheiser were pretty good, but i quite like being able to have some sound from the surroundings. Even though the hold was pretty impressive for something not secured to your ear, the cable always won and ended up yoinking them out of my ears.

Edit: added comment to Senheiser Mx 55 section.

Day 7 – A week & building pcs

Wahoo! I’ve been able to post every day for a week! I wasn’t quite sure that I’d manage it. I’ve come quite close (half an hour) to failing.

Had some advise and help from a colleague working on my new desktop – pulled the motherboard back out of the case, and rested it on the anti-static bag. Plugging it back into the PSU, and then using the on-board power button (Yay, don’t need to use a screwdriver 😉 ) to initiate it. But, the same thing that happened as in the case – power flicked the CPU fan and on-board led lit up, but the system didn’t POST.

So, with the CPU socket clear, the board is DOA1. So, I guess I won’t be playing RA3 for a while.

Here’s two photos, as asked 🙂

  1. Dead On Arrival aka never worked properly

Day 6 – Kicking hardware into working

I spent this evening building my new computer, getting it all plugged in with the cables tidied away in a small (read a little too small) case.

3 hours later, everything is connected. Moment of truth… and nothing happens. Red light on the motherboard, not POSTing. 1 On initial power, the CPU fan twitches.

I’ve seen this one happen once before – the motherboard is probably touching the case. (A hardware guy at work also suggested that it might be fluff in the CPU socket, bent or damaged pin.) You can get plastic sheets to put under the motherboard. Last time, I and my brother used sellatape – put it over the pillers the motherboard is raised on, and then screwed through the sellatape. Before I try something quite that drastic though, tomorrow evening I’ll try taking the board out and check its raise clear from the case. I’ll probably also remove one or two of the pillers.

I did mean to take pictures of building it, but then I though, who would be interested?!  Heh, I’m just dumping this from my mind as I haven’t had time to prepare anything else… If this is actually interesting to you, please comment 😉

  1. The Power On Self Test is the basic test a computer goes through when you switch it on. Hardware information is displayed on the screen (unless its been replaced with a logo), and at the end of it, it normally beeps if its OK. Otherwise, it doesn’t make a sound.

Day 5 – Datacentre work

Today, I was planning on scanning through NaBlogPoMo’s blogroll and pick out a couple of good ones. However, life always likes to intervene, and at about 1730 a server decided to fail. Wouldn’t boot up, nothing on the console.

As I’m on call this week, it was my turn to head into the datacentre, to have a look and try to fix it. For some reason, whilst it was showing network lights (so the network card was obviously initialized), it wouldn’t show anything, nor would it respond at all to server commands. I was planning to switch the hard-drives into a spare server, but a colleague of mine called to say that I should first reset the BIOS. (Take the battery out, short the contacts).

In the end, doing that cleared the problem, and the server came back online OK. A little confused – it thought it was 1400, rather than 2100, but apart from that it was fine.

I’ve only ever seen that trick work once before, on an old desktop machine. Still, that’s a good thing to try – if the BIOS confuses itself into oblivion, you can reset it by taking the battery out and shorting the contacts. (With a screwdriver is normally easiest – you’ll probably just have used it to open the case.)

Another hardware trick I often use, I’m not sure how relevant this will be if you’re not in the UK – Plug the computer you’re going to work on into a power socket, but make sure the socket is off at the switch. The earth pin is never disconnected – the switch will only ever interrupt the power flow, not the earth. So, if you’re not sure about static electricity in your environment, its a good way of making sure you’re clean – as the earth will be connected to the computer’s case via the PSU 🙂

A quick spelling / grammar question to those reading – is “online” a valid word, or should it be written “on-line”? I’m never certain, but my spell checker seems to think that it should be “on-line”…

Day 2: Church

Yay! I’m actually going to get to church this week, for the first time in 4 weeks 🙂

(Yes, for those readers who don’t know, I’m a Christian)

Reasons I haven’t been to church the past 3 weeks:

  • Week 1: Moving servers from old datacentre to new one
  • Week 2: On-call busy weekend. Worked 22 hours in 24, I was asleep Sunday morning. There’s a story in that itself…
  • Week 3: Moving servers again. Yay, 2 down, 1 to go.

So this week I get to go to church, and next weekend I don’t, as we’ve got the last server move. I’ve been trying to find a new church at the moment, which is harder than it sounds in London. At the moment, I’m going to one that my friend (and old youthleader) Roger is working for 🙂

If anyone reading knows Rog and Terry – Roger has picked up Terry’s ‘Bones’ 😉

Week 2’s story… A server failed during the day (partitions went read-only) and so I had to go to the datacentre, to replace the hardware. (That was when I was twittering about a debian install being stubborn about picking up mirrors. In the end, a reboot and reinstall from scratch sorted it – its routing table was stuffed.) Started to go in at 2000 Saturday, arrived back in town at about 0030 Sunday. ish.

Anyway, that’s enough rambling. I need to run to catch the tube 🙂 Hopefully tomorow’s blog will have a bit more content and a little less rambling 🙂

Move Complete :)

My blog’s move is finally complete 🙂

As I said, my new RSS feed is available from https://kirrus.co.uk/feed/

With the move, my commenting system is now open, and does not require registration. Be patient for comments to be posted – the first time you post, your comment will be moderated. Also, I have a set of spam filters that may be a little too exacting; if a comment hasn’t gone up after a while feel free to contact me.

As well as the blog move to WordPress, had all three interviews. On the final interview I was offered the job and I accepted it. I started two days after the interview (thursday). Yay! Currently, my commuting time is a total of 5 hours a day, so I’m already thinking about moving closer to the office.

Interview – I had to take a brief test, which was interesting. The first section was grammar, one of which we had to find what was wrong with “LCD Display” and “PIN number”. Later, it turned out, that the website of the company which I’m now working at has a very similar error, with “ZDR reboot”. Fun fun.

I will be working on a theme for this blog shortly – this is a stock “K2” theme. I saw that elwoodicious is using K2, and it seems to be quite handy 🙂 (Look at the footer for a link to info about K2)

Photographs – My memory card reader is ready and waiting next to my laptop for me to download another batch of photos from my camera, so the next post will be the best out of that batch.

Computer – I’m back on my laptop, because my new hard-drive has failed in a very similar way to the old one. I’m guessing that theres’ a problem with the PSU or SATA PCI control card.