Category Archives: Remember This

Magento Session Files

Magento (the popular open-source online shop system) likes to store its PHP session files in ~/public_html/var/session/

Most debian servers don’t have that in their cron job that deletes old session files.

So, you probably want to set it to store it’s session files in the default location (/var/lib/php5) or alter your cron job (/etc/cron.d/php5)

Fun!

Invalid method in request \x16\x03\x01

So, ran into this one. Firefox is throwing this error, along with ‘SSL_ERROR_RX_RECORD_TOO_LONG’. Turns out, apache was serving plain HTTP on port 443, as it hadn’t been given a default SSL config.

Other causes may be: Corrupted SSL cert (rare). Mis-configured proxy. Not adding “SSLEngine On” after configuring an SSL cert. But mostly, you’re trying to talk HTTPS to an HTTP serving webserver.

`a2ensite default-ssl` (on debian) fixed it. Well, fixed in in that the default server now has a snake-oil self-signed cert, but, you know, fixed it. šŸ™‚

Possible missing firmware on debian squeeze

If you get these errors:
W: Possible missing firmware /lib/firmware/rtl_nic/rtl8105e-1.fw for module r8169
W: Possible missing firmware /lib/firmware/rtl_nic/rtl8168e-2.fw for module r8169
W: Possible missing firmware /lib/firmware/rtl_nic/rtl8168e-1.fw for module r8169
W: Possible missing firmware /lib/firmware/rtl_nic/rtl8168d-2.fw for module r8169
W: Possible missing firmware /lib/firmware/rtl_nic/rtl8168d-1.fw for module r8169

or

W: Possible missing firmware /lib/firmware/rtl_nic/rtl8168f-2.fw for module r8169
W: Possible missing firmware /lib/firmware/rtl_nic/rtl8168f-1.fw for module r8169
W: Possible missing firmware /lib/firmware/rtl_nic/rtl8105e-1.fw for module r8169
W: Possible missing firmware /lib/firmware/rtl_nic/rtl8168e-3.fw for module r8169
W: Possible missing firmware /lib/firmware/rtl_nic/rtl8168e-2.fw for module r8169
W: Possible missing firmware /lib/firmware/rtl_nic/rtl8168e-1.fw for module r8169
W: Possible missing firmware /lib/firmware/rtl_nic/rtl8168d-2.fw for module r8169
W: Possible missing firmware /lib/firmware/rtl_nic/rtl8168d-1.fw for module r8169

Do this as root (or using sudo):

#Ā  apt-get install firmware-realtek

Win!

If you have other firmware issues, n1md4 suggested installing: firmware-linux and firmware-linux-nonfree in the comments (thanks!)

Eaccelerator mirror / downloads

Eaccelerator is insanely useful in my line of work. However, their main downloads are down right now, so I’m mirroring the latest version here:

https://kirrus.co.uk/stuff/eaccelerator-0.9.6.1.tar.bz2
https://kirrus.co.uk/stuff/eaccelerator-0.9.6.1.zip

You can see the files sha1sums here: https://eaccelerator.net/wiki/Release-0.9.6.1

Alternatively, if you’re scripting (we are), you can use the following to get my (‘up-to-date’) version:
https://kirrus.co.uk/stuff/eaccelerator-latest.tar.bz2

bz2.. because that’s the version we use here šŸ˜‰


Quick useful sysadmin stuff

Two useful things I have found or use šŸ™‚

Firefox Awesomebar search trick

A wonderful tip, that someone sent into the ubuntu-uk podcast. (I can’t remember who, or the episode. Comment if you know and I’ll credit them here! šŸ™‚ )

You can search, in any website’s search function, using firefox’s address bar. Now, at first glance this sounds really boring and useless, but it really isn’t, at all.

First, we need to find a website to search. Let’s use launchpad’s bugs search, for Ubuntu. So, we go here:

https://bugs.launchpad.net/ubuntu/
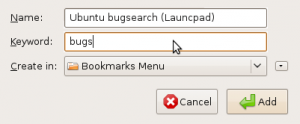
Screenshot Firefox add search bookmarkThen, right click on the search box, and click “Add a keyword for this search”. This brings up the standard bookmark – your search keywords are stored as a bookmark. Give it a useful name, something to help you next time you go sorting through your book marks. Now, the keyword is how we use this trick. I’m going to use “bugs”, but you can use anything you want, just remember, this is the word you put before your search string in the address bar. Click Add.

Screenshot Firefox address bar search for bugsNow, all we have to do, is to search for a bug. Let’s use the classic bug 1.

Open a new tab (CTRL + T), then in the address bar type [your keyword] microsoft market share, and hit enter.

Lo and behold:
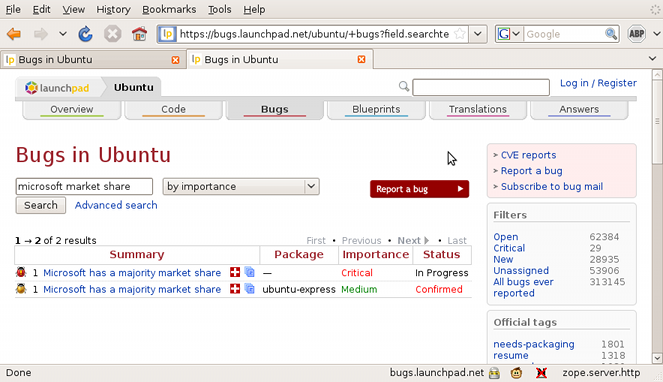
Screenshot Firefox launchpad bug 1

Testing SMTP-AUTH the fast way

Found a really handy little command line program called “swaks”. Great if you’ve ever needed to test SMTP-AUTH, and didn’t want to have to base64 the username and password yourself. Here’s a quick rundown on the command and flags I use with them. (Should be fairly obvious, comment if not!)

swaks -s [smtp-server-name-or-ip] -au [smtp-auth-user] -ap [smtp-auth-password] -f [from-address-of-testing-email]

Hit enter, and it’ll ask you the “to” email address. Type it in, and it gives you the full connection readout, just as if you were doing it with telnet (or netcat) on the command line:

<- 220 smtp.our-domain.com ESMTP
-> EHLO gemini
<- 250-smtp.our-domain.com
<- 250-AUTH LOGIN
<- 250-AUTH=LOGIN
<- 250-PIPELINING
<- 250 8BITMIME
-> AUTH LOGIN
<- 334 Z29vZCB0cnkgOikK

And so on. šŸ™‚

Day 4 – Falling back to the meta-referance

Last night I posted on twitter that I was struggling to find stuff to post about. jkblacker (Not bassets, sorry Josh!) suggested that I post about how I’m finding it hard to find stuff to post about… so here it is šŸ˜‰

Not exactly the most spectacular day 4, especially since I’ve got 26 left to go, but we’ll see what happens.

Parts for my new computer started arriving today. I’d hoped that it would all arrive, but unfortunately not. So, right now I’ve got RAM, the PSU, Motherboard, CPU cooler and a copy of Windows. (Yes, I know, horrible, but I’m building a gaming machine, wine isn’t there yet, and Linux hasn’t reached critical mass šŸ™ )

Sporadically over the past week or so, I’ve been trying to use search and replace in vi/vim. Finally got it drummed into my head! Here’s the syntax for single item search and replace:

:%s/OLDSTRING/NEWSTRING/

If you want to replace every item in a document, then add “g” to the very end. “g” in this context means “greedy” – i.e. replace everything. (Thanks JPE – I did learn it after all!)

This is the same sort of syntax as usable in the command line tool “sed”. For example, if you wanted to replace a space in a file with a comma, then you’d do:

sed 's/ /,/g' oldfile > newfile

I’m sure there’s a better way to specify that syntax… please feel free to comment šŸ™‚

Firefox won’t upgrade!

Firstly, apologies about the lateness of writing a new post. I’ve been struggling with my server, trying to work out why apache2 is eating RAM. I’ve made a really nasty hack to sort it out for the moment though, which will give me more time to find out what is going wrong.

One of my old friends from Church sent me an email, asking me what was wrong with his firefox. Every time he launched it, what appeared was firefox 2. Very strange, since the version of firefox he has installed is:

3.0.1+build1+nobinonly-0ubuntu0.8.04.3 - meta package for the popular mozilla web browser

Well,Ā  that looks like the normal browser to me. At one point, he has had the “ubuntuzilla” browser installed for a little while. (But not anymore).

A couple of questions on the Ubuntu-uk mailing list didn’t turn up anything. So, I asked “how do you find what binary a command runs”? The answer came back from Matthew Wild (thanks!):

ls -l $(which firefox)

I cheated a little. I’ve not come across $(command), but I have come across `command`. So, I asked my friend to run “ls -l `which firefox`”. He replied with:

lrwxrwxrwx 1 root root 20 2008-02-09 17:16 /usr/bin/firefox -> /opt/firefox/firefox

Er.. that looks wrong to me. The packaged firefox binary for version 3 is in /usr/bin/firefox-3.0. Looks like the uninstall of ubuntuzilla didn’t go so well. I asked him to run:

"rm /usr/bin/firefox && ln -s /usr/bin/firefox-3.0 /usr/bin/firefox"

Which removed the old link, and added the correct one. (I should have asked him to run those commands through sudo thinking about it..)

That solved his issue and he’s now happily running firefox 3. Anyone have a better way to implement this fix, if we ever need it again?

Matthew kindly explained the difference between “$(command)” and “`command`” in earlier today. No difference šŸ™‚

$(command) is easier to send to people so they don’t have to find the backtick key. (UK keyboards, above the tab key)

Hidden Ubuntu Gems: Window Selection, Always on Top & Password Gen

I thought it was probably a good time for another Ubuntu-related post, so here we go.

Window Selection

Window controls, selection raising etc

Something I found on one of my explorations, is this really handy feature (handy for me at least), which allows you to give a window “focus” (or selection) merely by putting your mouse over it. To activate it, click on “System”, go to “Preferences”, and then click on “Window”. Up pops a small selection window.

As you can see, I’ve ticked “Select windows when the mouse moves over them”. You can also have windows be raised to the top of the screen if you hold your mouse over them for a certain length of time. As my collegue at work found, setting the interval to “0” is not very useful…

There are a couple of other tweaks you can make here. I’ll let you explore them on your own šŸ™‚

Always on Top

“Always on Top” allows you to basically tell the system that you want a window to be the upper-most on the screen, no matter what else you do. You can’t “Raise” anything above it. I tend to use this little gem with my next tip.

Set a window to be always on top by right clicking on the title bar (the big orange bar at the top of the window, which contains the minimize, maximize and close buttons). Click the “Always on Top” option. ThatĀ  window will now stick on top of your screen. Undo it, by right clicking again on the title bar, and clicking “Always on Top” again.

Password Gen (pwgen)

pwgen is a small, neat, command-line program to quickly generate fairly easy-to-remember, fairly secure passwords. You can install it by clicking here, or going to whichever package manager you prefer (synaptic, Add-Remove Programs, apt-get or aptitude) and installing “pwgen”.a screenshot of pwgen with my preferred settings in use

Use it simply by typing “pwgen” in a terminal (“Applications” > “Accessories” > “Terminal”). I tend to run it with the command “pwgen 8 1”, which generates one 8 character password.

Now, if you’re adding a lot of users to a system or something (I am currently at work), using a combination of these tips will save you time… I’ll leave it up to you to work out how to combine them. (Hint: resizing a terminal window like I did above is a good starting point.)

Notes / MySQL Transactions

Why should you not use your notepad as a coaster? This is why:

Notes
The notes did say this, before my lovely hot black coffee destroyed them:

“begin” == Start transaction
“commit” == End transaction, saving all changes
“rollback” == Undo all changes that you’ve made in the transaction

What are they? In mySQL 5, with a table storage type of “innodb” you can use transactions. This means, that you can make a set of changes together, like recording the removal of a credit, and the adding of an advert to a website, at one instance, even if it’s multiple mysql transactions within one connection.

You do that, by sending the command (literally “BEGIN;” or “begin;”) to start a transaction, run all the queries you need to run, and then run the commit if you want the all the changes to take, or rollback if you don’t. If any one of the sql queries fails after you’ve made a begin, and it shouldn’t have, you can rollback *all* the changes you’ve made to the database. Obviously, this needs one mySQL connection, but if you’re using more than one each run of the program you’re using, I’d be very surprised.

Xen Gutsy Links

A post full of links and unsorted info about using Xen on Ubuntu Gutsy Gibbon, so that I don’t forget. (This lot has taken ~2 days to collect…) May make a full howto sometime… probably not though, as my boss knows this stuff better than I. Xen is pretty cool though…

https://help.ubuntu.com/community/Xen (useless for gutsy…)

The Xen console doesn’t work (xm console <domU>), network works once, and then never again… Going to paste this here as its in a pastebin, not sure when it will expire… (Have tweaked slightly, snipped a couple of things out, added couple of things in)
http://rafb.net/p/49Ku5e10.html

>> OK, I have made a little progress on this.  I mounted my VM image on a
>> loopback and chroot'd to it.  I opened /etc/init.d/hwclock.sh
>> and /etc/init.d/hwclockfirst.sh and added the following to the top of each
>> file:
>>
>>   exit 0

ALSO SEE: http://lists.cvsrepository.org/xen-tools/Jul07/0332.html

sudo xm create -c </path/to/config/file>

-----------------

# Ever-increasing network device names?

# Just disable the correspondent udev rules by deleting/renaming your
/etc/udev/rules.d/<NUMBER>persistant-net.rules. (number was 70 for us...)

guest# mv /etc/udev/rules.d/{,.}z25_persistent-net.rules

# And then make sure your vif (in your instance config file) contains your mac
# address like:
vif = ['ip=192.168.0.45,mac=<random valid mac addy>']

Just be sure to stop the instance (domU), and then restart (re-create) it again when needs be…

Also, when in the Xen console, try hitting enter before using the escape sequence (CTL +]) if it’s not working. Sometimes it enters into the console after the “login:” prompt has been printed, and doesn’t seem to pick up that its just had a new connection…
The ALSO SEE link: http://lists.cvsrepository.org/xen-tools/Jul07/0332.html

Using Serial console & xen console (serial console conflicts with xen console):
http://phaq.phunsites.net/2007/06/30/xen-console-grabbded-devttys0

/boot/grub/menu.lst stuff, to enable us to use a serial console as well as xen:

serial --unit=0 --speed=115200 --word=8 --parity=no --stop=1
terminal --timeout=2 serial console

Goes in the top of your menu.lst, outside the automagic sections…

## additional options to use with the default boot option, but not with the
## alternatives (These options are not used with the Xen Kernel!)
# defoptions=quiet splash console=ttyS0,115200n8

For the default kernel, (NOT the xen kernel).
Goes inside the AUTOMAGIC section of your menu.lst, adding to the options already there.

## Xen Linux kernel options to use with the default Xen boot option
# xenkopt=console=tty0 console=ttyS0,115200n8 xencons=ttyS9

Note the xencons=ttyS9. Use a serial port (ttyS<No.>) that doesn’t already exist.

Your Xen kernel definition should look something like this, after you’ve run “update-grub”:

titleĀ Ā Ā Ā Ā Ā Ā Ā Ā Ā  Xen 3.1 / Ubuntu 7.10, kernel 2.6.22-14-xen
rootĀ Ā Ā Ā Ā Ā Ā Ā Ā Ā Ā  (hd0,0)
kernelĀ Ā Ā Ā Ā Ā Ā Ā Ā  /xen-3.1.gz
moduleĀ Ā Ā Ā Ā Ā Ā Ā Ā  /vmlinuz-2.6.22-14-xen root=/dev/mapper/volume-root ro console=tty0 console=ttyS0,115200n8 xencons=ttyS9
moduleĀ Ā Ā Ā Ā Ā Ā Ā Ā  /initrd.img-2.6.22-14-xen
quiet

The guys on irc ##xen @ freenode are really helpful…